
|
|
Gill Jacobs is a health writer, who helped run FLAG, the Food Labelling Action Group, set up by Michelle Berriedale-Johnson and Sarah Stacey. She now has her own business in Low Level Laser Light Therapy, Light for Health, and writes a blog on habits for health as we grow older: Wiseuptohealth.com
|
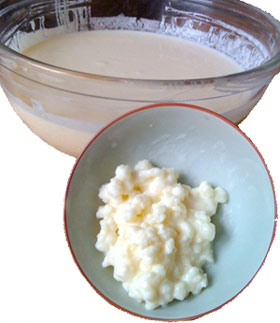
What is kefir? Kefir is a fermented drink, most often made with animal milk. It has a broader range of beneficial bacteria than yogurt, and the bacteria are better at colonising your gut. This means you have a greater chance to improve your digestion, your intolerances, and your overall health. Unlike yogurt, kefir is made with ‘grains’, which are small cauliflower like balls made up of yeasts and bacteria, surviving and feeding off the nutrients from dairy milk. Different kefir grains can be found to feed off sweetened water, or coconut milk, but the process of keeping them ‘happy’ and well fed is more tenuous, and needs periodic boosts with dairy milk to keep them alive over time. Start with a small amount of kefir, and work up from one teaspoon a day gradually, because you may react to the increased bacterial load with die-off symptoms. This is not a reaction to the milk. If you can get raw unpasteurised milk from a farmer, or farmers’ market, then it's preferable to use this. There have been no reported outbreaks of illness from raw milk in England and Wales since 1992. That can’t be said for quite a few other foods. For more on this see the Wise up to Health blog and, to find supplies of raw milk in your area, check the Natural Food Finder website. However, kefir grains improve pasteurised milk by bringing back some of the enzymes and bacteria lost in the pasteurisation process. Raw goats milk is also something you may want to use, and is readily available to buy, often frozen. Make sure the milk is full-fat, organic, non-homogenised and from grass-fed cows if dairy milk. If you feed kefir grains on low fat milk they do not have enough nutrients to keep them alive. Getting your grains But before deciding on what kind of milk, you need to plan ahead and work out where you are going to get your grains from. You can buy them online if you don’t have a friend with an excess supply to pass on. You only need a tablespoon to get going. This is a good UK source at Kefir Heaven made with organic pasteurised milk. Transitioning these grains to raw milk, from pasteurized, should be done gradually – for guidance see here. Powdered kefir starter packs are for up to six uses only. You don’t get the full spectrum of beneficial bacteria with a starter powder. Grains, on the other hand, can live indefinitely if they are fed and looked after well. Equipment You will need: A muslin cloth placed over the fermenting jar and secured with a rubber band or a hair band is preferable to using the lid, because it allows the air from fermentation to escape. If you do use the lid instead, open it now and again to prevent build up of gases, especially if the milk comes near the top of the container. Making the kefir If you want the kefir to start fermenting straight away you will need to gently heat the milk to blood temperature, or leave the milk out of the fridge until it reaches from 70-78 degrees before adding the grains. Don’t forget the kefir entirely while the grains get to work. Give them an occasional stir to make sure all the grains have access to the nourishment from the milk. It is best not to use a metal spoon or metal containers. How long does it take? There is never a set time, as so much depends on the temperature, and the amount of grains to milk. In winter I place the milk and grains in a close-fitting insulated bag, and this seems to work in my average to low temperature kitchen. When the milk thickens and coagulates the kefir is ready, just before it separates into curds and whey. It is safe to consume at the point of separation, but the taste is more acidic and this can be hard on the grains. Over cultured kefir can be used in cooking instead of milk. For those sensitive to lactose a culturing time of 24-48 hours is recommended at temperatures of 65 to 80F. After 24 hours separate the kefir from the grains and leave the kefir out for up to five days more in a warm climate, and 15 days in a cold climate, in a clean jar up to ¾ full, with a loose fitting lid. Tighten the lid once or twice a day and shake up the kefir, before loosening the lid again. Extending the process This extended process not only decreases the lactose considerably, it also increases the nutrition from continuing fermentation, even though the grains are no longer with the kefir. You can also go for another batch straight away by adding milk to the grains after the first kefir is separated from the grains. B vitamins are increased, and calcium and magnesium are thought to be more bio-available. Once you have the kefir ready, keep in the fridge. Leaving the kefir with the grains for more than 48 hours could deprive the grains of food, and is not recommended. What to do with grains in between batches of kefir? However, it is advisable to make small and frequent batches, rather than always putting kefir in the fridge between batches. Going away, you can leave the grains in the fridge in milk for up to ten days. If away for longer, freeze the grains. The grains will take up to a month to come back to life after freezing, although I have used ex-frozen grains in a shorter amount of time with no problem. Other people recommend that you dehydrate the grains. See here page 71. How do I drink my kefir? I make a raspberry smoothie with it in the morning, with frozen or fresh raspberries, concentrated cherry juice, I teaspoon of maca powder, 1 teaspoon of cinnamon and nutmeg powder, grated fresh ginger juice, a knob of coconut oil, ½ teaspoon of butter oil, ½ teaspoon of fermented cod liver oil, a raw egg, and 1 teaspoon of powdered seaweed. How has my health changed? Taking antibiotics after a dental procedure did not result in any digestive upset since making my own kefir. Normally I would take probiotics after the course of antibiotics had finished. Even more significant is that I no longer need three monthly visits to the dental hygienist for dental plague removal. See Dr Mercola on his journey to better dental health after introducing fermented foods into his diet. Finally, when people start noticing how well you look, perhaps a healthy gut from fermented foods has something to do with it! Can you travel with or mail kefir grains? In conclusion, bear in mind that this process is one of experimentation, rather than exact amounts. But you will need a minimum of 1 tablespoon of kefir grains to up to a litre of milk. So don’t put it off any longer! Strike a blow for ‘taking control of your health’ and get gifted or order those grains now. You won’t regret it, and you will save a fortune in probiotics!
First published September 2013
Click here for more articles
|
 Kefir is one of the best ways to start if you want to introduce home-made fermented foods into your diet – even if you do believe that you may have problems with dairy products. If you are lactose intolerant, kefir helps to ameliorate it by pre-digesting the lactose. A very small proportion of people intolerant (as opposed to allergic) to cow's milk (pasteurised and raw) cannot tolerate kefir, but it is rare. Those who are truly allergic to cow's milk are allergic to one or several of the proteins in cow's milk which will not be affected by the fermenting process. If they want to make kefir, they should do so with coconut milk or water.


